Recipe Review: Pear Ginger (Walnut) Muffins

IMG_0448

Miss Fats has been lazily loaving around her winter workshop baking.  Friday mornings were once a scheduled place for baking experimentation in sweet breakfast delights.  However the cold and apathy has resulted in a continuous slew of breakfast loaves week after week for her regular Friday meetings.  While Miss Fats is relatively sure folks are satisfied with a blackberry lemon pairing, or carrot cake crumble, there’s something a bit lifeless about the loaf object that doesn’t make for baking blog fodder.  So she apologizes to all of you who came here to today to hear about the variations of spice cake that have come out of Miss Fats kitchen (she knows you’re all incredibly disappointed).

In an effort to liven her baking efforts (and frankly, get her blogging again), Miss Fats finally tried out Food52’s Pear Ginger Walnut Muffins by Ms T.  These little guys have been mocking Miss Fats from her Pinterest for months now.  Every week she goes to browse the bounty of breakfast snacks collected on her board, and each week assumes she’ll give this muffin a try.  But she’s been damn lazy; and the idea of portioning out twelve whole muffins on a Friday morning just seems like too much (see what this damn vortex does to people?  Can’t even scoop muffins anymore #notarealproblem).  But February brought a little break in the weather (high 30s have never felt so good), so she rode that heat wave right to muffin town: time for something shiny and new.

IMG_0452

In order to cut down on morning baking, Miss Fats went ahead and made the pear ginger sauce the night ahead.  Ms. T’s instructions were relatively easy to follow, however she found that she needed to cook the sauce for quite a bit longer than the specified 15-20 minutes.  Maybe Miss Fats was dealing with some juicy pears, but hers sat stewing for a good 30-40 minutes.  This was fine, because she just let them hang out while she went about her business.  The sauce simply sat overnight waiting to be muffined the next morning.

As per usual, Miss Fats refused to use more than one bowl for these baked goods.  She simply began with step three, using a whisk instead of an electric mixer.  The dry were added to the wet and produced a thick thick batter of gingery goodness.  Obviously, after a bit of tasting, she upped the salt by about half a tsp.  Now Miss Fats isn’t rolling in walnut-money so she ended up leaving out the nut action.  The muffins baked up in almost exactly 20 minutes, which combined with the ten minute cook time (thanks to sauce prep) made for the ideal morning baking project.

The real beauty of these muffins is their outsides match their insides: mainly they’re both aesthetically pleasing and truly tasty.  Their plump, slightly crisp muffin tops provide the perfect shell for the tender, moist crumb inside.   The sauce only partially broke down the fruit, leaving tender chunks of spiced pear throughout the muffin.  The ginger flavor is subtle and frankly the pear flavor is nonexistent.  However these muffins are more about the gentle flavor and homey texture of a fresh, moist breakfast treat.  While Miss Fats is usually a fan of bolder flavors, she recognizes that not everyone wants kick in the face first thing in the morning.   These ginger pear muffins are the perfect hit of spice and sweet to sit along side a big cup of coffee on a cold morning.  She will definitely be making these again.

Now the real question is how can Miss Fats mix this thing up?  She wonders if there are variations on this sauce-muffin action that can exploited for future breakfast baking projects.  She supposes that any hearty fruit that lends itself to a fruit butter or mash would be appropriate.  That means apples, peaches, and rhubarb had better watch their backs.  Miss Fats is coming for you.

IMG_0456

mini lemon layer cake

IMG_0299

There are no excuses.  Miss Fats has been exceedingly lazy in the new year and apologizes for her absence (she doesn’t need to hear about all about your tearful two months away.)  But this winter has been rough, people.  Miss Fats won’t continue to bore you with tales of windchill or triple socks or ice cabin fever, but she will allow herself to hide behind the fridged fortress of double vortex that sucked a good deal of joy from the month of January.  Alright.  Cold complains and lazy excuses complete.

Miss Fats is back in action this lunar new year (real new years resolutions, people) with some tasty treats to push (aspirationally) into warmer times ahead and remind us all that a damn good meal can make about any slip on the frozen Chicago sidewalks a hell of a lot better.  So in honor of these bright blue skies between snowfalls in the Midwest, Miss Fats baked up a sunny lemon cake.  This mini layered cake provides enough tang to remind us you can still feel something beneath that thick wool sweater.

IMG_0297

Now “winter citrus” is certainly hot right now (exploding pinterest), Miss Fats would like to think this little cake takes your winter concerns a bit more seriously.  She’s so tired of the new years healthy resolution business.  Let’s get real people: all those heavy, welcoming, holiday treats bring joy and celebration for a reason.  They’re damn warm and inviting.  And guess what?  January is colder.  So throw the resolution garbage aside, stop torturing yourself and go for the gooey mac n cheese so your toes don’t fall off.  Continuous cold salad meal is doing nothing to encourage circulation.  In an effort to keep blood flowing to all appendages, Miss Fats tried to create a mini cake that both brightens and satisfies.  She’s down with the abundance of winter citrus (can’t get enough of those satsumas), but she doesn’t think they need to mean light and healthy desserts meant to refresh folks on a hot, sticky summer day.  As much as we’d all like to fantasize about the summer months, we have more practical concerns: like how to regain feeling in one’s face.

IMG_0243

This little lemon cake is a dense, decadent dessert that helps you keep that winter insolation on the below-freezing bright blue days of February.  It begins with layers of coconut lemon cake that is closer to a rich pound cake.  Then comes homemade lemon curd and a thick, creamy cream cheese center.  All of this is wrapped in a blanket of fluffy whip cream that disguises the dense lemon attack inside.  Now there are a number of steps to this recipe.  However Miss Fats encourages folks to take the necessary shortcuts: buy the lemon curd.  She totally understands.  Trader Joe’s makes a damn fine and affordable one that could easily make due here.  Don’t have cream cheese around?  Skip it or make it well in advance (it can easily hang out in the fridge for a few days).  The creamy, tangy, cheesy filling is delightful, however an extra dollop of whip cream can make due in a pinch.  Miss Fats went ahead and stabilized the whipped cream with gelatin, but if the cake is for immediate consumption there’s no need to take this step.  The most important thing here is that you’re indulging in the sweetness of dessert during the dead of winter. Get on it.

Mini Lemon Layer Cake
makes one six inch cake

cake:
adapted from Baker’s Royale Coconut Citrus Cake

1/4 cup sour cream
1/4 tsp baking soda
3/4 cup sugar
1 egg
1 egg yolk
6 tbs melted butter
1/2 tsp baking powder
1 tsp vanilla
2 tbs lemon zest
1/4 cup lemon juice
2 tbs oil
1 cup flour
1/4 cup coconut milk

lemon curd
Miss Fats used David Lebovitz’s excellent curd recipe cut in half

1/4 cup lemon juice
1/4 cup sugar
pinch of salt
1 egg
1 egg yolk
3 tbs butter

cream cheese filling

4 oz cream cheese
1/3 cup sugar
1 tsp vanilla
pinch of salt

stabilized whipped cream

1 tbs cold water
1/2 tsp gelatin
1 cup heavy whipping cream
1 tbs lemon zest (reserved from the curd)
1/4 cup sugar
1 tsp vanilla
pinch of salt

1. Make the Curd.  Miss Fats simply halved the recipe followed David Lebovitz’s instructions to a T.  Worked out perfectly.  Make that curd and set aside until assembly. Reserve about a tbs of the zest for the whipped cream.  In a small bowl, combine the 1/4 cup sugar for the whipped cream and the zest, rubbing it together with your fingers to release the oils.  Let this hang out while you get to business with the cake.

2. Bake the Cake. Preheat oven to 350 degrees.  Grease two six inch cake pans.  In small bowl (Miss Fats recommends a small measuring cup), combine the sour cream and baking soda. In the bowl of a stand mixer, combine eggs, yolk and sugar.  Mix until combined.  Add the melted butter and beat on high for 3-4 minutes.  Add vanilla, zest, baking powder, lemon juice and oil.  Mix until combined.  Add the coconut milk to the sour cream mixture and stir until combined. Using a spoon or rubber scraper, fold in the flour in two batches, alternating with the milk/sour cream mixture (ending with the milk).  Divide batter between the two pans and bake for approximately 25-30 minutes, or until a tooth pick comes out clean.  Allow cakes to cool in the pan for about 10 minutes, remove and allow to fully cool on the counter.

3. Make the Filling.  In a small bowl, heat the cream cheese in the microwave for approximately 30 seconds or until slightly softened.  Add the remaining ingredients and mix until combined.  Set aside until cake assembly.

4. Make the Whipped Cream (right before cake assembly.  do not do this ahead of time).  In a small bowl, add the water and sprinkle the gelatin over top.  Allow the gelatin to bloom while you begin whipping the cream.  In a large bowl (or stand mixer), combine the cream and zesty sugar, and beat until fully combined.  Add the vanilla and salt, beat on high until very soft peaks begin to form.  Zap your gelatin mixture in the microwave for about 10 seconds or until melted.  With your mixer on high, slowly stream in the gelatin to your whipped cream.  Continue to beat until still peaks form.

5. Assemble the cake.  Carefully even out the top half of the cake with a serrated knife, then cut each layer in half to form four even layers.  Place the first layer on a small plate or platter.  Spread half of the curd on top and top with a second layer of cake.  Spread the cream cheese layer next.  Top with the third layer of cake.  Finish with the remaining curd and cake.  Spread a thin layer of the whipped cream all around the cake to create the crumb layer.  Don’t worry: this will be super ugly and messy.  Put the cake in the fridge and allow this to set for about 30 minutes.  Clean up or something.  Finish off the cake with a thick layer of the remaining whipped cream.  (As you can see from the pictures, Miss Fats did not layer enough cream on the outside of her cake.  She hope you’ll make wiser decisions.)

IMG_0275

Slice into this little guy for full flavor bomb.  A baby bite of this cake packs a heck of a lot of lemony, tangy flavor that makes all that layering and labor worth it.  Since you worked so hard, you should probably also top it with a healthy dollop of extra cream if you have that lying around.  Call it a “snow blanket” if you will.

Best snowy, sunny day ever.

grumpy cat crack cake attack

IMG_7733

Miss Fats is mid birthday rush this week.  She has two “high seasons” for birthday cake baking–May and November–when she’s convinced a ton of parents got together and conspired to breed an entire generation of children born in the same week, spaced perfectly six months apart. 20-30 years later, Miss Fats is busy crafting three cakes in one week to celebrate all that Valentine love (gross) that bred an entire generation of pod people. ( i.e. her near and dear friends.)

Now, she began #birthdayweek (if it’s a conspiracy, it may as well have its own hashtag), with a classic birthday cake (a rare request!), but she’s going to save that post for later; because she is damn excited about the craziest of 30th birthdays “cakes” she put together this past weekend for her friend E’s bash.  Meet the Wacky Crack Attack.

IMG_7736

Miss Fats loves to bake for any crowd, however she has a couple of favorite individuals who she’s always eager to feed and please with decadent desserts.  E is right at the top of the list thanks to his insatiable sweet tooth and affinity for seconds (that’s appreciation, people).  She knew there was no way to get any specific flavor requests from him for the big day (he will eat anything and loves all things sweet), so Miss Fats just decided to dream up the most insane cake monster she could think of.  Initially, she was gravitating toward an ice cream concoction, since he and Miss Fats have been known to venture far across the city in search of giant creamy cones.  However there were already plans for frozen custard on the night of the celebration (double dessert. duh.); And she knew any old chocolate layer cake thing wouldn’t do.  Not to mention it was E’s 30th and therefore required Miss Fats to kill him via sugar object.  As you know, Miss Fats has got pie on the brain, and she had a recent conversation about the Momofuko Crack Pie that had been nagging at the back of her head for a couple of weeks now.  That was it.  Crack pie.  The name and object were ideal for E: done and done.

IMG_7735

But this is a birthday, people.  And a big one.  For an important friend.  So Miss Fats could hardly stop there.  So what does crack need?  More crack, apparently.  Something she adores about Momofuko’s pie is it’s complete and total acceptance of ugly.  None of that prissy, fancy pants dessert garbage (all prim and proper: boo), but  instead a total embrace of disgusting deliciousness: truly privileging taste over aesthetics.  Naturally this meant Miss Fats wanted to extend this aesthetic to the cake (pie) topper.  She decided to make excessive clusters of salty sweet goodness to mound on top of the ugly monster pie base to create a Frankensteinian sugar object capable of catapulting insulin levels and destroying any pancreas in its way.  You can’t even imagine how excited she was.

IMG_7731

This was Miss Fats first Momofuko recipe attempt and she knew they were notorious for being somewhat finicky and required great attention to detail.  Therefore for the actual pie, she stuck straight to it and executed the body of the beast step for step, to the t.   It was really that crack topping where she got to work on her salty-sweet craft, improvise and (literally) sculpt the perfect collection of morsels.  So what goes into wacky crack, you ask?  Well the short answer is: whatever the hell you want.  This is really more of a method (methodology?) than a recipe.  Miss Fats is going to share her mixture for you all, but she encourages you to get down and dirty with it: be creative: be cavalier.

wacky crack clusters:
makes about 2 cups of clusters

3 crunchy chocolate chip cookies (Miss Fats used Trader Joe’s Chocolate Chip Dunkers, but Chips Ahoy would also be good here)
3 peanut butter sandwich cookies (Nutter Butters)
1/4 cup honey roasted peanuts
1/2 cup pretzels (broken up a bit)
1 chopped candy bar (Miss Fats used a mini M&Ms bar she had on hand)
1/4 cup peanut butter chips
1/4 cup melted chocolate chips
1/4 cup melted peanut butter chips
sea salt

salted caramel:
1/2 cup sugar
3 tbs water
2 tbs butter
1/4 cup heavy cream
1 tsp salt (to taste)

1. Make the caramel sauce: in a small sauce pan, heat the sugar and water over medium, carefully stirring until the sugar dissolves.  Once dissolved, turn the heat to medium high and DO NOT stir or take your eyes off it.  Allow the sugar to caramelize and turn a deep amber (about 5-8 minutes), swirling the pan by the handle every so often.  Once the caramel has deepened in color, remove from the heat and add the butter and cream (be careful: it will bubble rapidly).  Stir until completely smooth.  If it seizes up, return to medium low heat, and stir constantly until smooth.  Add salt to taste.  Set aside to cool slightly.

2. Cluster assembly: line a large baking sheet with parchment paper (makes for easy clean up).  Throw down all of the dry cluster ingredients and roughly mix.  Drizzle the caramel, chocolate and peanut butter over top.  Toss together and roughly pat into a single layer of goodness.  Drizzle another layer of caramel and chocolate over top and sprinkle with salt to make it nice and pretty.  Allow to cool completely by either leaving it to harden on the counter, or sticking in the fridge for about an hour.

3.  Once cool, break into large chunks and enjoy.

To top the pie, mound the clusters into any monstrous form you’d like.  Donezo. Miss Fats’ wonderful roommates also created the perfect topper using some creative pen work and some printed off images of Grumpy Cat.  Since E looks like grumpy cat with a mustache, it was the ideal expression of birthday affect for an aggressive dessert.

IMG_7760

In the end, her pie wasn’t perfect (but should it be?).  Her oven had some hot spots that caused the custard to bake slightly unevenly, and the crust baked a little more than she would have liked.  However, anyone who’s executed this pie knows, the whole thing isn’t really meant to be eaten like a pie.  Instead, the crack pie creates a salty sweet object that is to be scraped from the pan and consumed in a messy pile of all that is good in life.  Yes people” the crust sticks to the pan.  It sticks real bad.  And she’s sure that one could do some serious greasing and throw down some parchment.  But that would probably ruin part of the joy of crack pie: this is as much of an aesthetic–tactile–experience as it is about taste: embrace ugly. The crack clusters added a crazy crunchy layer to the chewy, creamy pie custard and cookie crust to make for a mouthful of all things good.  This is some serious mouth porn.  Pure dessert filth.  She highly recommends it.

IMG_7781

Between eight people, they only managed to get through half of the pie.  It’s fucking intense.  The rest was sent home in a glorious pile to be eaten while standing over the kitchen counter with a fork in hand.  Probably in your underwear, at 3 am.  Crack pie will definitely make it into Miss Fats’ recipe arsenal, but clearly must be accompanied by some sort of chocolate pretzel object. ( She feels no need to explain this.  It’s self-evident that chocolate and pretzels make everything better.)  She hopes E is enjoying his leftovers and that Wacky Crack Attack was all he could have dreamed of for his big birthday celebration.  Or she hopes he’s dead of diabetic shock from pie overload.  Either or.

recipe review: cranberry apple pie

IMG_7703And so pie month continues at chez Miss Fats.  In order to motivate her baking and force her to tackle the classic and simple pies she fears most, Miss Fats participated in the recipe testing for Food 52’s latest “Best Thanksgiving Pie” contest.  As a tester, you simply execute the recipe per instructions are provide a 100 word review for the site.  Each pie ideally has three volunteers who provide feedback on the taste, instructions and over all experience.  However 100 words is damn short, and Miss Fats is pretty sure no sweet treat can be accurately summed up in such a short space (eating and food description demand [illicit] excess).

So she’s sharing a fuller review of the pie recipe here for you all, complete with modifications and tips for the baking process.  Miss Fats wound up selecting the Cranberry Apple Pie for testing.  This was primarily for aesthetic reasons (hey, Miss Fats is a visual person, and firmly believes in the power of good food porn), but she also had some extra cranberries on hand and liked the simplicity of this pie’s filling: no crazy spices or techniques: just fruit hanging out with more fruit.  Additionally, the crust recipe seemed standard enough: the usual all butter recipe with a little lemon zest to complement the tart fruit.  Simple.  Done.  She even had all the ingredients on hand.

Unfortunately, Miss Fats hit problems early on.  She meticulously following instructions to test the rhetoric and measurements of the recipe.  However, as the mound of flour piled up, it was incredibly clear to Miss Fats that there’s no way 1/3 cup ice water would be sufficient.  She went ahead, adding the specified amount, praying that by some pie miracle it would come together (she actually believed this given her amateur pie status–so naive).  However, she instead encountered the exact reason she hates making pie:  She felt as though she was scrambling against time as the butter warmed and threatened to create a gummy, dense crust, but the incredibly crumbly, dry dough just would not come together and instead created a mess.  She quickly sprinkled an additional 1/3 cup water over top, working it into the dough with a rubber spatula.  Though the dough began to form, she was facing her most annoying enemy: fucking butter/flour crumbs at the bottom of the bowl (she hates that shit).   Finally ditching the spatula, she went for a last sprinkle of ice water and went elbows deep, pulling together the uneven dough and cursing flour out lout (literally).  Scrambling to get that butter business into the fridge as soon as possible, she used the plastic wrap to assemble the hunks and hoped that if we all just calmed down a bit (dough included), it would come together in time.

IMG_7713

After eating (critical) and some quiet time, Miss Fats returned to the pathetic butter disks, assuming they’d developed into impossible masses of gluten and dry hunks of powder resembling the old container of Play-Dough she has lying around.  She prepared herself for some serious elbow grease and frustration tears during the rolling process, throwing the disks down onto her floured countertop, prepped to let disaster ensue.  However to her surprise, the dough proved surprisingly pliable and only cracked a bit at the edges where she clearly had failed to mix properly.  Carefully turning and working the disk outward, she rolled out a fairly thick twelve-inch crust and transferred it to her pie pan.  She was calming down.  It would be ok.

The filling was incredibly simple, both in technique and ingredients.  Miss Fats was surprised (and slightly disappointed) to see how few apples the recipe called for (only 5??).  However she executed them to a t, and loaded her prepared pan with the spiced fruit mixture.  Layering her second crust, she did her best to make the edges as pretty as possible (not easy for Miss Fats), which essentially resulted in some bloated, sausage-like crimping that would undoubtably end up underdone.  On with the egg wash and a sprinkling of raw sugar, and into the oven for an hour.  Smooth sailing from then on out.

IMG_7714

In the end, the pie was fine.  She was pleasantly pleased by the filling, which had a sharp, tart flavor and a really nice balance of textures between the slightly softer, sweeter pink ladies, and grannies that still had a bit of a bite.  The cranberries themselves, sprinkled bursts of tartness throughout and created a pleasing marbling effect.  Her number one complaint?  Not enough.  She could have seriously used more of that filling action. The crust-fruit ration was way off. Hell, from now on she’ll probably just go for that portion of the recipe sans crust, throw in the oven to get caramelized and soft, and then go topping a cold, creaming scoop of vanilla ice cream with all that apple-cranberry business.  With a drizzle of salted caramel.  Obviously.  Despite the beautifully browned, surprisingly, non-chewy texture, she frankly, found the crust bland.  And too thick. (Well, that’s probably more of Miss Fats fault; but also there should not have been three cups of flour in that recipe.)  The lemon zest was a nice touch, but it could have seriously used more salt (Miss Fats would up it to about 1 tsp) and a bit of sugar given the tartness of the filling.  Oh well.  The important part is that Miss Fats was not beaten by this baking beast.  She’s a bit bruised (well, more like scolding herself for being a whiney little child about pie crust), but she’ll take away some serious experience from this pie.  Fruit pie has yet to be conquered, but she’s well on her way to proficiency.

Up next?  Pure crack.

recipe review: salted chocolate pecan pie

IMG_7626Miss Fats is going to share one of her biggest fears with you: pie.  Clearly she has a bit of a bias toward fluffy cake objects and their bready relatives, but this mainly stems from her crippling fear of pastry.  The simplicity and precision required to execute even the simplest of pastries requires a restraint and attention that Miss Fats rarely has.  She needs a bit more wiggle room.  Because she’s lazy.  And hates measuring.  As a result, she stays away pastry, hiding behind a defensive layer of language that suggests it’s “too fancy” or “fussy” for her taste.  This is a load of crap.  The reality is that Miss Fats just hasn’t been practicing and fears the perpetual disappointment that it can often create.  She hates nothing more than when a carefully labored pie crust, chilled and minimally handled, winds up too chewy or dense.  This may be because she believes that in order to be a truly great baker, one should have a grasp on a standard crust.  And when it comes down to it, Miss Fats just doesn’t.  And thanks to grad school logic: thus she is not a real baker.

Ok enough self-loathing and indulgent nonsense.  She knows the only way to really get past this hang up is to approach it like every other pastry novice: practice, practice, practice.  So in the spirit of the season, Miss Fats is taking pie on for reals this time.

Her resistance to pie primarily stems from not only this fear of pastry, but the number of flubbubs that can occur with any pie production.  Is the fruit too sweet?  Too moist?  Did I add enough flour this time?  Is it going to boil over and make a big sticky mess at the bottom of my oven?  Will my crust shrink in the pan?  Or will it absorb my filling and turn into a soggy mess? Ugh I cannot roll out pie dough.  Why is it so ugly? See: so many anxieties go into a pie.  Miss Fats is a such a coward.  Get over it.

So in order to ease her way into the pie game, she decided to go for a single crust, non-fruit pie in an attempt to eliminate as many potential problems as possible.  Since Thanksgiving is fast approaching and she loves herself some pecans, Miss Fats settled on a classic pecan pie: only naturally, this required the addition of chocolate and salt.  Duh.  The final pie ended up being a hybrid of Smitten Kitchen’s Foolproof Pie Dough and David Lebovitz’s Chocolate Pecan Pie for the filling.

IMG_7622

She ultimately stuck pretty close to the original recipes, particularly with the dough.  Miss Fats anxiously measured, pulsed that food processor exactly the right number of times, and carefully added the freezing cold liquids to the batch.  Reluctantly to even touch the dough with her hands, she scraped it into the plastic wrap, played a bit of hot potato with the disk and threw it in the fridge.  Miss Fats was pleasantly surprised to find that the dough rolled out with ease and didn’t crack or she wasn’t forced to stretch her gummy over-mixed mess like in past pie experiences.  Her pie vanity issues were rendered null thanks to her roommate’s beautiful pie pan complete with a wavy mold, that she gently pressed the dough into.  For the filling, she omitted the bourbon (only because she didn’t have any on hand), upped the salt content to a full teaspoon, and went with semi sweet chocolate chunks instead of chips.  She decided not to pre-bake the crust (out of laziness and lack of baking beans), and simply allowed the filling to fuse with buttery crust.  The finishing touch was brushing the crust with a little egg wash and sprinkling it with some raw sugar crystals before baking.  Then obviously, after cooling the topping got a heathy sprinkle of sea salt to add those perfect bites to cut the gooey sweetness of the pie filling.

The pie was a freaking miracle.  Somehow the damn thing turned out and it looked good.  Miss Fats couldn’t have dreamt of a better outcome given her inexperience.  The crust’s mixture of butter and shortening gave it both a chewy and flakey texture.  It remained crisp on the bottom but managed to soak up some of that caramel-y filling, creating a nice contrast with the decadent insides.  Next time Miss Fats makes this pie, however, she’ll be using bittersweet chunks instead of semi-sweet.  She actually found it to be just every-so-slightly too sweet for her taste: she’s pretty sure a hit of darker, bitter chocolate is just what this pie needs to send it over the edge.  Overall the pie was not perfect, but well beyond expectations and enough to keep Miss Fats’ hopes up and baking until Thanksgiving.  She feels restored and ready to take on these scary dessert objects.  Just you wait: soon cake pans may be exchanged for rolling pins… though who is she kidding?  Probably not.  (There’s just more options for peanut butter with cake…though maybe not?)

stuffed carrot peanut butter muffins

Miss Fats has had a busy back to school month.  That means lots of events, meetings and trying to keep up with coursework, and of course, a ton of baking.  Sunday Sundaes is currently a poor reflection of her efforts since returning to Chicago (and so is, frankly, Miss Fats’ phone), but she’s literally been churning things out too fast to photograph.  Now that she’s fully settled back into the pace of the year, she’s sharing one of her favorite morning baked goods to usher in a whole slew of pastry posts she’s got in the works for you.

IMG_7565Miss Fats’ most regular baking gig includes the bi-monthly workshop she co-coordinates for graduate students, faculty and visiting guests.  This means churning out platters of scones, muffins, loaves and all that bready, breakfasty fun on Friday mornings.  This past week featured one of Miss Fats’ favorite people to bake for, I.  She’s a big fan of any friend who willingly takes seconds and thirds without asking.  I is always game to grab an extra cookie, slice of cake or giant bag of baking bits that Miss Fats shoves into his hands.  So she gave him full license to pick a breakfast item or flavor profile for his workshop.  His choice was the result of a little brainstorming ‘sesh that ended up circulating around the crazy delicious dessert team Miss Fats dined on at Blackbird last spring.  In pure pastry genius nonsense, Blackbird served her up a carrot cake with peanut ice cream that sent Miss Fats over the edge and she’s been dying to try out that flavor combo ever since.  I’s workshop was the perfect place to test out the peanutty waters.  Luckily adores carrot cake and anything peanut butter related, so the challenge was to transform an elegant, James Beard award winning pastry chef’s plate into a bready, handheld breakfast object.  Game on.

The end result was the craziest muffin Miss Fats has ever created: carrot cake stuffed with a cream cheese filling and topped with a peanut streusel and peanut butter drizzle.  But it totally worked.  You got every necessary flavor profile: the sweet spice of the moist carrot cake, the gooey tang of the cream cheese filling, and the salty crumble crunch of the peanut topping.  She might have a new all time favorite muffin.  This muffin boasts the perfect harmony of texture and fall flavors to take your ‘buds to a harmony party (whatever that is).  Though there’s a lot of steps with these suckers, she suspects they could easily be transformed into a lazy loaf or cake as well.  Not to mention, they’re totally worth the muffin work, because who doesn’t love a hand-held object that packs this much flavor and contrast.

IMG_7568

They’re not so pretty, but they’re damn tasty.

Stuffed Carrot and Peanut Butter Muffins:
adapted from Smitten Kitchen’s carrot cake
makes 24 muffins

filling:
8 oz cream cheese
1/3 cup sugar
1 tsp vanilla
pinch of salt

muffins:
2 cups flour
2 tsp baking soda
1 tsp cinnamon
1 tsp ground ginger
1/4 tsp ground nutmeg
1 1/2 tsp salt
2 cups sugar
1 1/4 cup oil
4 large eggs
3 cups grated carrots

topping:
2 tbs natural peanut butter
1 tbs butter
1/4 cup brown sugar
2 tbs flour
large pinch of salt
1/2 cup chopped peanuts (unsalted, or be sure to adjust salt if yours are salted)

glaze:
1/4 cup natural peanut butter
1/4 cup powdered sugar
pinch of salt (depending on your peanut butter)
water (if needed)

1. Preheat oven to 350 degrees and line 2 cupcake pans.  Make the filling: heat the cream cheese in a bowl in the microwave for approximately 1 minute.  Stir in sugar and vanilla and set aside.

2. Prepare the streusel: Melt the peanut butter and butter in the microwave.  Using a fork, mix in the flour, brown sugar and salt, until combined and you have a slightly-moist, crumbly mixture.  Add the chopped peanuts.

3.  Make the muffins: In a large bowl, combine the oil, eggs, and sugar.  Mix until will combined.  Add the dry ingredients and stir until just combined.  Fold in the carrots.

4. Assemble the muffins: Distribute approximately 2 tbs of the batter into each cup (filling about half way).  Then follow with about 2 tsps of the cream cheese scooped into the center of your cups.  Top them off with another 2 tbs of muffin batter (Miss Fats actually recommends filling these nearly to the top.  She was disatisfied with how flat her 3/4 filled muffins turned out).  Finally, sprinkle the topping on your filled muffins. Bake for approximately 20 minutes or until a toothpick comes out clean.

5. Make the glaze: while the muffins are baking, heat the peanut butter in a small bowl.  Whisk in the powdered sugar, salt, and vanilla.  If the mixture is proving too thick to drizzle, add a little water (this will depend on the consistency of your peanut butter).

6.  After your muffins have cooled for approximately 10 minutes, drizzle the glaze over top.

Six steps to salt-sweet bliss.  The beauty of this recipe is that all its components are tasty little devils on their own.  To cut back on work, Miss Fats recommends skipping the glaze or filling (though she’s pretty sure you’ll regret it!);  though do not skip that crumble, people: crumble is crack.  These guys will store just fine at room temperature in an air tight container for a couple of days.  Though she doesn’t understand why they’d need to: she dares you to just eat one.  No wait, Miss Fats takes that back: don’t even bother.  Just fill your mouth with the crunch-salt-sweet-creamy-tang that is the perfect morning muffin.

fancy pants coconut rhubarb cake

IMG_4089

Miss Fats returned to birthday baking with a particularly exciting project: she needed to turn out an impressive cake monster for one her closest friends in Chicago and new roommate, N.  Last week, the city’s miserable heat finally hit with full force, but managed to cool down just in time for N to throw a casual Monday night backyard birthday bash in celebration of her 28th.  Now it must be noted that despite its improptu planning, N never half-asses or disappoints when it comes to entertaining.  She is essentially the greatest hostess Miss Fats has ever witnessed; and the last minute birthday picnic was no exception.  Not to mention she makes it look entirely effortless and elegant at the same time.  We’re talking anthropologie/barefoot contessa status here (don’t pretend like you don’t know what Miss Fats talking about.)  Therefore Miss Fats was faced with the task of creating a cake to fit right in with the deceptively simple.

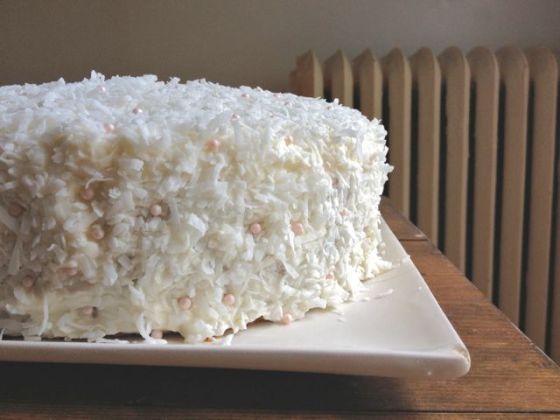
Miss Fats had been mentally preparing for this one for a while: she had noted an off-hand comment made months ago when N admitted her favorite cake flavor: coconut.  She catalogued this fact for future birthday surprises (Miss Fats loves nothing more than a good surprise).  She knew the classic, four-layer giant fluffy coconut cake would be the perfect pastry object in celebration of N’s 28th.  Sure, a delightful cupcake would have been a perfectly pop-able backyard birthday treat, but Miss Fats felt N deserved something more excessive in the spirit of being born.  A four-layer cake was a no brainer: no matter the size of the crowd, N definitely deserved a giant pile of sweet pastry lit up with candles and properly escorted in with song-accompaniment.

IMG_4090

Now there was no way she was going to make just a coconut cake.  There had to be a proper pairing (Miss Fats tends to ascribe to a three-component cake).  She knows just how much N loves rhubarb, plus Miss Fats loved the idea of a splash of pink in the center of a white fluffy cake.  Since N, herself exudes the easy-peasy elegance, Miss Fats knew that the cake had to perfectly mix a rustic, clean and polished exterior, punctuated with a tangy, coconutty surprise on the inside.  She felt that a decadent coconut pastry cream and sharp rhubarb compote would express N’s personhood: sweet, yet perfectly punchy with a sour hit, and always indulgent.

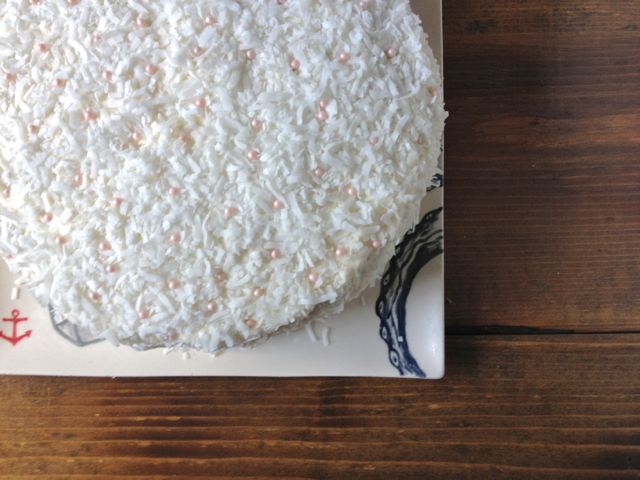
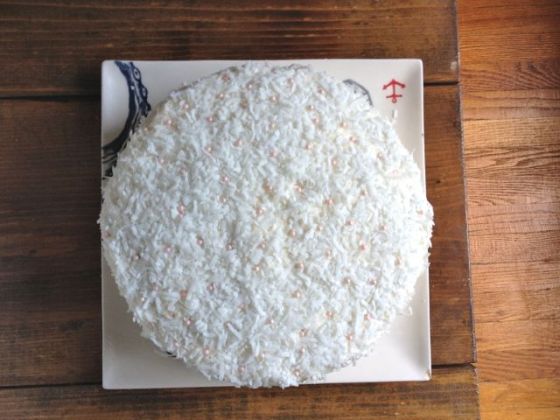
The exterior and decoration had to be clean and simple. Miss Fats knew the classic flaked coconut cake decoration would provide the ideal base.  The fluffy white strips of coconut pressed into a coconut buttercream has all the freshness and whimsy of N herself.  Yet it needed just the smallest of touches to elevate it to make it a bit more special in celebration of N’s birthday.  Miss Fats went with some shimmery light pink pearl sprinkles she had on hand.  Pressed into the coconut and buttercream base, the pearls added a bit of fancy to an otherwise nostalgic and slightly vintage cake.

IMG_4096

So now Miss Fats will go ahead and share all the components of this bright and summery cake.  The coconut cake, buttercream, pastry cream and rhubarb filling are endlessly useful and can be transferred to almost any other baking endeavor.  Go ahead and throw that cream inside a cupcake and top with ganache for a Almond Joy taste good.  Or slather a shortcake with some rhubarb compote and a dollop of whip cream for breakfast/dessert heaven.  Miss Fats highly recommends you go crazy with any and all cake components.  Some of you will recognize these recipes from J’s insane mini cake just a couple of months ago.  Both the rhubarb filling and buttercream are the new additions that Miss Fats chose to switch out for time and temperature purposes (too damn hot for that excessive swiss buttercream business.)

Fancy Pants Coconut Rhubarb Layer Cake:
makes one, four-layer, nine-inch cake
pastry cream adapted from Willow Bird Baking’s Ultimate, Moist, Fluffy Coconut Cake
cake adapted from What’s for Dinner?’s Truly Awesome Coconut Cake 

cake:
1 cup (2 sticks) butter, softened
2 cups sugar
5 eggs
2 1/2 cups flour
1 tsp baking soda
1 tsp salt
1 tsp vanilla extract
1 tsp coconut extract
1 cup unsweetened coconut milk

coconut pastry cream:
1 cup unsweetened coconut milk
1/4 cup sugar
1 tsp vanilla extract
good pinch of salt
1 1/2 egg yolks
1 tbs corn starch
1 tbs butter
1/4 cup whipping cream
1/2 cup flaked, sweetened coconut

coconut buttercream:
1 cup butter, softened
2 tsp coconut extract
1 tsp vanilla extract
3 cups powdered sugar
approximately 1 tbs milk, if needed

rhubarb compote:
3-4 stalks of rhubarb, roughly chopped
1/4 cup sugar (to taste)
1/2 cup water
pinch of salt
1/2 tsp vanilla extract
1/2 tsp of powdered ginger (optional)

2 cups of sweetened, flaked coconut
pink pearl sprinkles if desires

1. Make the cake: Preheat oven to 350. Grease 2 six-inch cake pans.  Beat butter and sugar on high in a large bowl or stand mixer until pale and fluffy (about 3 minutes).  Add eggs one at a time, beating until combined after each.  Add coconut extract.  On low-speed, alternate adding the dry ingredients and coconut milk.  Increase speed to medium high and beat until combined (5-10 seconds).  Pour into pans and bake for approximately 15-20 minutes or until a cake tester comes out clean.  Allow to cool for at least 10 minutes before removing from pan.

2. Pastry cream: in a sauce pan, over medium, heat the coconut milk, sugar, salt, vanilla and coconut extracts.  In a small bowl, mix the corn starch and egg yolks until well combined.  Once the cream is hot, temper the yolks by carefully adding 1/4 cup of the milk to the bowl, whisking constantly.  Add the yolk mixture back to the sauce pan, whisking constantly. Continue to mix over medium high heat for 3 minutes (for the FULL 3 minutes!).  Add the butter and coconut flake and mix.  Pour into a bowl and cover with plastic wrap (make sure you press the plastic wrap onto the surface of the cream to prevent skin-formation).  Store in fridge until cake assembly or until fully cooled. When you’re ready to assemble, beat whipping cream until soft peaks form.  Fold into the chilled cream and set aside until assembly.

3. Rhubarb compote: In a saucepan, combine the rhubarb, water and sugar. Cook until the rhubarb completely breaks down.  Check sugar and add more to taste.  Mix in extract and ginger.  Allow to fully cool.  This can be done way ahead of time, stored in a jar and enjoyed as frequently as possible.

4. Coconut buttercream: beat butter on medium high until fluffy.  Sift in powdered sugar in batches to prevent making a huge mess.  Beat in extracts.  Beat in milk if the frosting is too thick.

5. Assembly: Begin by carefully cutting your cakes into 4 even layers.  Place first layer on your cake plate and spread on half of the compote.  Add second layer and spoon on all of the coconut pastry cream.  Leave approximately an inch of space around the edge to make sure it doesn’t ooze out the sides as you assemble.  Add the third layer and spread on remaining compote and top with the final layer of cake.  Spread on a thin layer of buttercream as a crumb coat. Don’t worry: this will look terrible.  Chill the cake for about 30 minutes or until the frosting is firm.  Spread remaining buttercream all over the cake.  Press the flaked coconut into the side and top.  Use your fingers to press pretty pink pairs into the frosting. (Miss Fats recommends doing this in front of the TV or with some sweet tunes in the background.)

IMG_4104
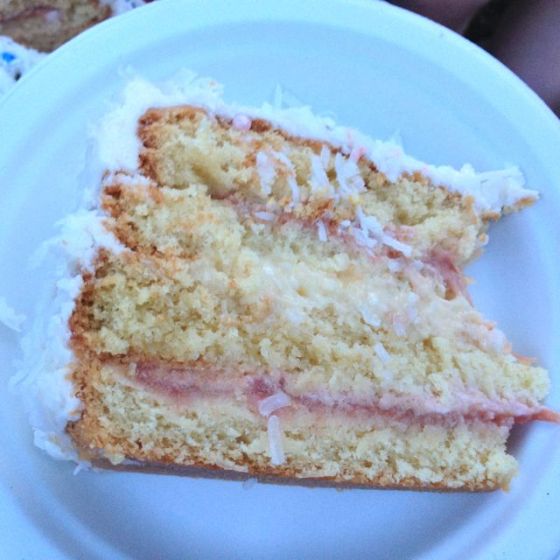
Now that says celebration.  The crumbly cake is perfectly balanced with the ooey gooey-ness of the compote and pastry cream.  It is definitely a coconut explosion, but Miss Fats likes to think that it won’t overwhelm the reluctant cake eater.  Not to mention the brightness provided by the rhubarb makes this a delightfully seasonal pastry object perfect for a backyard BBQ.  Miss Fats cautions you: this cake is deceptively light (in terms of flavor and texture), and can easily be consumed in excess.  However: worse things have happened.  Miss Fats has already received outrageously overzealous complements on this cake, so she knows she’s done some decent work here.  She’s just beyond pleased that N enjoyed herself in the form of excessive cake consumption.  N now just needs to get ready for future roommate cakes to come.

IMG_4106

spiced chocolate and peanut butter dulce de leche cupcakes

IMG_4033

Okay. Miss Fats will admit this is a bit of a weird combination.  On paper.  However, in practice, these flavors (cinnamon, peanut butter and dulce de leche) come together in a the form of a moist cupcake filled with oozing peanut butter and topped with a rich caramel-y frosting.  This is a flavor punch.  One that shouldn’t really work, but like that ugly/pretty girl you keep staring at, becomes something you can resist paying attention to.  What is it about the sticky sweet weight of peanut butter and dulce de leche that makes you both hate and love yourself?  Miss Fats likes to think that even as the thick peanut butter filling coats your mouth hole, all you want to do is linger in cupcake weirdness because the sugar-salt-spice rush breaks your brain a little.

This combo has emerged as Miss Fats’ go-to cake to pair with tacos. It last made the appearance as a decadent layer cake for an epic taco birthday bash last fall.  However for this taco housewarming, she felt the cake should be able to be consumed with a drink in the other hand.  (Or even better: double fist those cupcakes.)  What emerged is a mixed baby of mexican flavors and salty peanut goodness.  This cupcake features a cinnamon and cayenne spiced chocolate cupcake stuffed with peanut butter filling and topped with a dulce de leche frosting: a whole delightful spectrum of brown.  The odd addition of peanut butter creates that salt-sweet balance with the candy-sweet dulce de leche, and the cake brings a little spicy to the mix: salt-sweet-heat.

IMG_4039

The taco menu was not the only reason Miss Fats decided on this bizarre cupcake.  The dessert was in celebration of an incredible housewarming hosted by the coolest couple she’s ever known, in the craziest apartment known to man.  Team Miss Fats likes to refer to their magical game nights with them as stepping into the “hottest club in Chicago.”  She’s talking craft cocktails, multi-course meals and a space that Miss Fats is convinced isn’t real.  They used to attend game nights in the most outrageous studio/loft apartment that featured floor to ceiling windows, an amazing collection of handmade art that literally scaled the entire space, beautiful hand-built furniture, and proper entertaining dishware (oh hey, salad plate and dessert fork).  This list completely fails to capture the experience of Club A & D, which is probably akin to drinking from Willy Wonka’s chocolate river in magical candy land.  Miss Fats wants to stress that this was their OLD apartment.  She’s completely out of words for their new space.  She’d like you to fantasize about this studio/game night and then cube it: then you’ve maybe approached an idea of the Club A & D experience.

So the real question was: how can Miss Fats make a dessert that lives up this party?  Well the answer is: she can’t.  Nor should she really try, because it’s doomed to failure.  Miss Fats can’t bake flying unicorns, after all.  She decided to move forward with an indulgent cupcake that embraced the kooky mix of flavors that were as rich and celebratory as the evening itself.  Naturally this started with a base of chocolate.  Normally, a taco party would seem to demand something on the coconut-flan-y spectrum; and Miss Fats seriously struggled with herself on this.  She was so close to attempting a tres leches cake, but just could not seem to get herself out of the chocolate mind set.  Sticking to her guns, she decided to go with her weird flavor bomb from last fall and add a little heat to the mix.  Miss Fats paid homage to the mexican flavors by adding cinnamon and cayenne to her usual chocolate cake batter, to create a secret mouth fiesta and cut through the decadence of the rich peanut butter and dulce de leche.

IMG_4040

This recipe follows Miss Fats’ method of a three-part stuffed cupcake, that is incredibly easy.  Three bowls, three components, and about an hour of your time (outside of cooling and bake time that is).  As usual, these little guys can be broken down into two days: cakes baked off day one, and all the other ooey-gooey stuff on day two.

Spiced Chocolate and Peanut Butter Dulce De Leche Cupcakes
makes approximately 18 cupcakes
cake adapted from The Kitchn’s Dark Chocolate Cake

cake:
2 cups sugar
3/4 cups cocoa powder
1 3/4 cups flour
1 1/2 tsp baking powder
1 1/2 tsp baking soda
1 1/2 tsp salt
2 tsp cinnamon
1/2 tsp cayenne
2 eggs
1 cup buttermilk
1/2 cup oil
1 cup hot coffee

filling:
1/2 cup peanut butter
1/4 cup dulce de leche
1-2 tbs milk
1 tbs oil (optional depending upon your peanut butter)

frosting:
1 stick butter, softened
4 oz cream cheese, softened
3/4 cup dulce de leche (or essentially, the remaining can)
2 cups powdered sugar
1 tsp vanilla
1 tsp salt

1. Make the cakes: preheat oven to 350 degrees and prepare cupcake tins.  In a large bowl, mix together sugar, cocoa powder, flour, baking soda and powder, salt, and spices.  Whisk in eggs, oil and butter milk.  Mix vigorously for approximately 2 minutes.  Pour in hot coffee and mix until fully combined.  Divide batter among cupcake trays. Bake for approximately 18-20 minutes or until a cake tester comes out clean.  Allow to fully cool.

2. Filling: In a small bowl, mix the peanut butter and dulce de leche.  Add approximately 1 tbs of milk and oil.  This will depend on the consistency of your peanut butter.  Natural peanut butters will likely require more oil for a smoother consistency.  You’re looking for a filling that approximates the gooey-ness of a freshly mixed jar of natural peanut butter.

3. Frosting: In a stand mixer (or using a hand-held one), beat the butter, cream cheese and dulce de leche on high until light and fluffy (approximately 2 minutes).  Add the salt and vanilla and mix until combined.  Sift in the powdered sugar and beat until combined.

4. Assembly: Using a small spoon, scoop out a hole in each cupcake.  Spoon in approximately 1 tbs of the filling.  Finally, spread the frosting over top, or swirl using a pastry bag (or gallon ziplock bag with the tip cut off).

IMG_4035

Now Miss Fats can’t claim that these cupcakes objectify her amazing friends, but she hopes they in the very least approach the endlessly creative, fun and surprising times at Club A & D.  The salt-sweet-heat of these little guys can only account for a fraction of the flavors of the club: they are full force-flavor kind of people.  Miss Fats can only dream of creating a mouth party of that scale.  For now, she’ll leave the remaining flavors to D, who turned it out with the crazy taco bar.  She just hopes they enjoyed these dessert delights as they danced and drank the night away.

peanut butter chocolate cake and fancy fails

IMG_3889This might be the best damn looking cake Miss Fats has ever made.  It’s also probably why it ended up being one of the most disappointing.  She’s  going to refer to this cake as a “fancy fail” from now on (notice it’s similarity to Fancy Feast).  Now this is being incredibly over dramatic and a bit self wallowing, but come on! Look at that thing.  It’s promising nothing but decadent flavor on par with its aesthetic level.  However this was not the case.  Spoiler alert: this is not a love story.

Ok Miss Fats will stop being a bummer to talk a little more about what’s going on with this beauty.  Since she’s fundamentally incapable of attending just about any event without a sweet treat in hand, Miss Fats’ recent invite to a belated wedding reception/joint birthday celebration was no exception.  This event boasted a wedding and two birthdays and therefore required her to impose a cake upon everyone.  Hell, Miss Fats wasn’t even really invited to this thing but you better damn well believe she was bringing a big ass cake in celebration.

IMG_3884She asked for her usual flavor request to help send her in a general direction; “chocolate?” was all she got.  Now this was the second chocolate cake of the week for Miss Fats (she had just gone to cacao town with D’s birthday cake earlier in the week).  Since Chicago weather had been crap, she didn’t even feel obligated to work with a cake that celebrated the sunshine and flavors of the summer (because let’s get real, summer literally just started in Chicago).  So shit was about to get real.  IE Miss Fats was going to lay down her favorite flavor combination of all time: peanut butter chocolate.

She knew there would be another cake at the party, so she felt less obligated to craft a cake that perfectly encompassed the couple (a task that Miss Fats’ has actually never even tried.  Though she can’t wait for a Frankenstein cake soon).  Instead, she was hoping to simply highlight the importance of celebration, decadence and excess.  This party was a fun and simple backyard affair, so the peanut butter seemed to be an appropriate way to dial back the ‘smance in favor of some childhood ooey gooey peanutty business.

IMG_3859

She knew that this type of celebration definitely required an actual cake: three celebrations can’t quite be encompassed in a little cupcake object.  However she’d been struggling with the humidity over the last week and was seriously worried about her super-moist chocolate cake recipe not holding up for this thing.  With D’s cake days before, the wet air wreaked havoc on the removing-cake-from-pan process and she thought it might be a good idea to go with a butter-based cake instead.  She’s a big fan of Bakers Royale and has a good deal of success with many of her recipe components, so when she found her Best Chocolate Cake Recipe it seemed like the natural choice.  It followed many of Miss Fats’ baking rules: minimal bowl action, no cake flour, and no butter creaming (these are not steadfast rules: just wonderfully attractive features that she often looks for).  It essentially resembled Miss Fats’ oil-based chocolate cake, but used melted butter instead.  She ended up using milk instead of the cassis because: a) Miss Fats really has no fucking idea what cassis is anyway and b) she’s a grad student not going to buy a bottle of that fancy liquor for one cake.  Given that the recipe produced two 8 inch cakes, Miss Fats ended up multiplying the recipe by 1.5 to get three 9 inch layers.  The cakes cooked beautifully and easily held up despite the wet wet air.

Now came the filling.  Miss Fats has been trying to think through the ultimate peanut butter filling for quite some time now.  Peanut butter is not just some creaming thing you can slap in between cake layers.  It’s a sticky-salty spread that should be celebrated flavor-wise, but requires a bit more work to transform it into a perfectly crafted cake filling that works with the textures of the cake and frosting.  She liked the idea of something between a buttercream/mousse: she wanted the intense flavors of a Reece’s Peanut Butter Cup, but a lightness that wouldn’t overpower the fluffy crumb of the cake.

She ended up going with Bakers Royale’s Peanut Butter Frosting, that boasted intense peanut flavor in the form of a buttercream.  She was a little worried about how much frosting this recipe produced and the intensity of the peanut flavor, so Miss  Fats made a couple of variations that she’s sharing with you here:

Peanut Butter Filling:
makes about 3 cups of filling
adapted from Bakers Royale’s Peanut Butter Frosting

1 stick of butter, softened
1 cup creamy, all natural peanut butter
1 cup to 1 1/2 cups powdered sugar (dependent upon how sweet your peanut butter is)
1 tsp vanilla
1 tsp salt + more to taste
1/2 cup heavy whipping cream

1. Whip the heavy cream until soft peaks form.  Set aside in the fridge.

2. Beat the butter and peanut butter on medium high until light and fluffy.  Add the vanilla and salt and mix until fully combined.  Sift in the powdered sugar and beat until combined.  Adjust salt based on your own preferences (Miss Fats obviously added more).

3. Fold the frosting into the heavy whipping cream.

IMG_3887

Since she was diggin’ on the look and feel of D’s chocolate cake from earlier in the week, she ended up going with the easy, spreadable chocolate ganache frosting.  Fully riding the salt-sweet train at this point, Miss Fats needed to jazz this thing up to keep it on par with the celebration level of the party.  She figured in-line with the backyard, slightly nostalgic feel of the event, a chocolate-covered pretzel would be the ideal object of decoration.  What says salt-sweet tasty town more than a chocolate covered pretzel?  However to keep it elegant (and photographable), she needed a bit of color contrast, so she ended up deciding to do both chocolate and peanut butter-dipped treats.  Miss Fats isn’t going to give you a recipe for these, since all she did was melt down about a cup of chocolate chips and a cup of peanut butter chips and dunked those suckers in.  To make them all pretty, she made a mess of herself and kitchen by using a fork to whip lines of peanut butter and chocolate across them. The only trick of these pretzels is not eating them all before they make it on to the cake (so so hard). Let them firm up in the fridge and stack them in a circle.  Boom. So pretty, yet to easy.

So what’s the problem, you ask? Is Miss Fats seriously just whining about how good looking her cake is?  Ok so here begins the abbreviated discussion of the cake’s problems (skip ahead if you’d rather live in cake fantasy land and see this as perfection).  So this is pretty fucking epic looking right?  And when you make a cake like this one, you want that first cut and bite to match the level of beauty (Miss Fats has a HUGE problem with beautiful cakes that cannot live up to their looks in flavor).  However, cutting into this cake, it crumbled. Total frosting/filling/cake mess.  The chocolate ganache pulled at the crumbly cake, destroying the three, carefully stacked layers.  Hardly the kind of display for a wedding: no embarrassing (cue tiny violins).  And while this mess may have been acceptable given the casual celebration, Miss Fats regrets to say that the flavor just didn’t quite make up for the disastrous structure.  There just wasn’t enough peanut butter filling to balance with the fudge of the cake and ganache.  Salt-sweet fail.

IMG_3886

Ok ok.  Miss Fats will stop now, because for the most part, guests seemed to really enjoy the cake (naively so).  And in the end, the bride and groom/birthday boy and girl seemed to really enjoy it.  Which is all she can hope for.  However if Miss Fats were to attempt this cake again, she’d seriously amp up that peanut butter filling: literally double that recipe.  She’d also return to her oil-based cake, which just has a bouncier texture that holds up to a sturdy filling like peanut butter.  This is to say that Miss Fats is not completely discouraged: she will try the ultimate peanut butter chocolate cake again.  Though this cake will probably haunt Miss Fats’ sugar dreams for a while, she recognizes that this was not a complete fail.  The real success came in making a beautiful cake for a beautiful crowd and couple.  They should just wait for peanut butter cake the sequel: coming to birthdays next summer.

CHOCOLATE Cake

IMG_3835Why all the yelling? (Obviously all caps=yelling. Get with it.)  Because this is some serious chocolate cake up in herrrrre.  Yet as per usual, chocolate fails at food photography and this picture cannot even begin to express the hidden cocao-ness layered up in that shining brown round object.  Miss Fats is talkin’ moist chocolate cake sandwiching both dark and white chocolate mousse, all contained in a rich chocolate ganache frosting.  Rich bliss.

How did Miss Fats go crazy, you ask?  After a brief birthday break, she returned to her idealistic work of making sure that no birth celebration goes cakeless.  Her friend D was throwing a casual mid-week-come-celebrate-me-if-you-got-a-little-extra-time-on-your-hands-but-no-pressure birthday drinks sesh and Miss Fats offered (forced) her baking skills on the evening.  She is a big believer in the birthday cake request: everyone gets to make all their guests eat whatever damn cake they like on their birthday (even if it’s some bullshit like a bundt cake or whatever).  So as usual she asked the birthday boy his favorite flavors: Miss Fats doesn’t need you to dream up your crazy cake idea, but she appreciates a general direction. And D sent her a dangerous way; one simple request: chocolate.

IMG_3843

Part of Miss Fats love of baking is thinking up the ideal sweet for the situation.  So birthday cakes present a particularly fun challenge: how do you essentialize a person in a cake?  Basically Miss Fats gets REAL excited about objectifying people.  But hey, at least you become a crazy tasty pastry object that everyone chows down on all evening.  Plus if you’re lucky, you get all lit on fire with candles.  Now Miss Fats is half kidding on this one (she hopes all her friends don’t go psychoanalyzing their birthday cakes and wind up thinking Miss Fats wants them to confront their repressed mother issues).

However she does spend a good deal of time scouring the interwebs for flavor ideas and recipes to help build the ideal person-cake.  In this case, D’s chocolate request felt incredibly appropriate.  Simple, classic and could easily be jazzed up for celebration purposes (oh god, please don’t go over thinking the rest of this post, D).  Chocolate is Miss Fats favorite kind of cake (false: chocolate is in fact her favorite object in existence in this world), so the real challenge was restraint in this case (which, clearly she didn’t do a GREAT job at).  However she knew that D’s cake should be a rich balance that didn’t overdo it on the sweet.  Additionally, D suffers from an unfortunate peanut allergy that kept Miss Fats far from her favorite peanut butter chocolate nonsense (more to come on that: just you wait ’til the next cake).  So her theory was: if he asked for chocolate, he is damn well getting chocolate.

IMG_3839

The first question was cake versus cupcake.  She decided that since D said it had been an eternity since he’d had a proper birthday cake, that she should serve it up right with a classic layered round cake.  Miss Fats stuck to her guns, and used her go-to chocolate cake recipe that has now appeared a bajillion times on this blog, but she’ll link you to it anyway.  Now the next question was what should this cake experience be?  She was real into the idea of those rich chocolate fancy restaurant cakes that beautifully layer mousse, ganache and cake like a thousand times and take ten million hours and an insane amount of precision to produce.  However D is not that fussy.  And neither is Miss Fats baking style.  So she decided to bring all the flavors of fancy town to a rustic, classic layered cake that didn’t go seducing you with all its glitz and glam.

This cake ultimately ended up being composed of four layers of chocolate cake (two nine-inch cakes cut in half), with two layers of Food & Wine’s dark chocolate mousse and one layer of white.  For the filling she made a full batch of the dark chocolate mousse which ended up being a little bit light for Miss Fats’ taste.  (Though guests seemed more satisfied with the proportions that she did.)  She halved the white recipe which was just fine considering the super sweetness of white chocolate.

Miss Fats recommends breaking this cake into two days.  Day one: bake off the cakes and store them wrapped in plastic wrap.  Make both mousses and allow them to properly firm up in the fridge over night.  Day two: make the ganache.  Then assemble the cake and mousse layers and allow to freeze while the ganache cools to the right spreadable temperature.

IMG_3837

Now it has been pretty damn hot in Chicago, so Miss Fats had some serious melt situation on her hands.  For those of you working in warmer, humid climates, she highly recommends assembling the cake layers and fillings and freezing the whole thing for at least 30 minutes before frosting.  This will allow the mousse to firm up before you go encasing the beast in a solid wall of fortifying ganache goodness.  Miss Fats is sharing her super simple ganache recipe that easily molds itself to a whipped, spread or poured version depending on when you decide to use it.

Easy Chocolate Ganache Frosting:
yields enough for one nine inch cake or twenty-four cupcake

1 bag of semi-sweet chocolate chips
1 cup heavy whipping cream
4 tbs butter, cut into pieces
1/2 tsp salt

1. In a medium bowl (or the mixing bowl of your stand mixer if you’re planning to do a whipped frosting), dump the chocolate chips, butter and salt.  Heat the heavy cream in a microwave safe dish for about 1-2 minutes, or until quite hot.  Dump the heavy cream over the chocolate chip mixture and let stand for a couple of minutes.  Whisk thoroughly until you get a smooth, glossy ganache.

2. For pouring: allow the ganache to cool for at least 10 minutes.  Then go to town.  For spreading: allow the ganache to cool to room temperature or until it reaches a buttery, spreadable consistency (about 2 hours).  For whipped: allow the ganache to cool for about an hour.  Then whip on high until soft peaks form.

This cake, despite its many steps and components was not actually that difficult.  Spread over two days, you only have an hour or two of actual work.  There’s just quite a bit of the waiting game with chocolate.  However the end result is pretty damn worth it: you get to bite into an incredibly moist trio of chocolate forms that play between chocolate’s sweet and dark, bitter sides.  This is a damn chocolate symphony.  And like a festive concert, this cake needed a little pizzaz to remind itself that it wasn’t taking itself too seriously.  So Miss Fats went to sprinkle town:

IMG_3847

Rainbow sprinkles, polka dots and chocolate?  Ingredients to throw any jaded grad student into childhood nostalgia (or at least Miss Fats hopes).  To make these simple (yet effective) decorations, Miss Fats carefully placed round cookie cutters on top of the cake and spooned in the sprinkles.  Clearly she wasn’t as careful as she should have been, because a few pesky dots found their way across the surface.  Oh well.

In the end, Miss Fats likes to think of this particular birthday cake as a serious yet lighthearted chocolate monstrosity.  It spans the excess of childhood, yet indulges in the rich decadence of fantasy adulthood.  D was celebrating his twenty-eighth after all: a weird year somewhere between things, and this cake’s attitude is same.  She hopes D enjoyed his birthday cakery, even if he ended up leaving it sitting on the streets of Chicago (don’t even get Miss Fats started on this story).  She’s kidding: everyone gets to do what they want with their own damn birthday cake.